

前边跟朋友们共享了 SpringMVC 一个大概的复位步骤及其要求的大概解决步骤,在要求处理方式中,牵涉到九大部件,分别是:
这种部件坚信朋友们在日常开发设计中或多或少都是有牵涉到,假如你对这种部件觉得生疏,能够在公众号后台回应 ssm,免费获取松哥的新手入门教程视频。
那麼下面的2~3篇文章内容,松哥想和大伙儿详细分析这九大部件,从使用方法到源代码,逐个剖析,今日大家就先讨论一下这九大部件中的第一个 HandlerMapping。
HandlerMapping 称为CPU映射器,它的功效便是依据当今 request 寻找相匹配的 Handler 和 Interceptor,随后封裝成一个 HandlerExecutionChain 目标回到,大家看来下 HandlerMapping 插口:
- public interface HandlerMapping {
- String BEST_MATCHING_HANDLER_ATTRIBUTE = HandlerMapping.class.getName() ".bestMatchingHandler";
- @Deprecated
- String LOOKUP_PATH = HandlerMapping.class.getName() ".lookupPath";
- String PATH_WITHIN_HANDLER_MAPPING_ATTRIBUTE = HandlerMapping.class.getName() ".pathWithinHandlerMapping";
- String BEST_MATCHING_PATTERN_ATTRIBUTE = HandlerMapping.class.getName() ".bestMatchingPattern";
- String INTROSPECT_TYPE_LEVEL_MAPPING = HandlerMapping.class.getName() ".introspectTypeLevelMapping";
- String URI_TEMPLATE_VARIABLES_ATTRIBUTE = HandlerMapping.class.getName() ".uriTemplateVariables";
- String MATRIX_VARIABLES_ATTRIBUTE = HandlerMapping.class.getName() ".matrixVariables";
- String PRODUCIBLE_MEDIA_TYPES_ATTRIBUTE = HandlerMapping.class.getName() ".producibleMediaTypes";
- default boolean usesPathPatterns() {
- return false;
- }
- @Nullable
- HandlerExecutionChain getHandler(HttpServletRequest request) throws Exception;
- }
能够见到,除开一堆申明的变量定义外,实际上就一个必须完成的方式 getHandler,该方式 的传参便是大家所掌握到的 HandlerExecutionChain。
HandlerMapping 的承继关联以下:
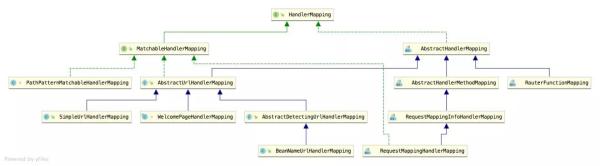
这一承继关联尽管看见有点儿绕,实际上认真观察就两类:
别的的全是一些輔助插口。
AbstractHandlerMethodMapping 管理体系下的全是依据方式 名开展配对的,而 AbstractUrlHandlerMapping 管理体系下的全是依据 URL 途径开展配对的,这二者有一个一同的父类 AbstractHandlerMapping,下面大家就对这三个重要类开展深入分析。
AbstractHandlerMapping 完成了 HandlerMapping 插口,不论是根据 URL 开展配对或是根据方式 名开展配对,全是根据承继 AbstractHandlerMapping 来完成的,因此 AbstractHandlerMapping 所做的事儿实际上便是一些公共性的事儿,将以一些必须实际解决的事儿则交到派生类去解决,这实际上便是典型性的免费模板方式 方式。
AbstractHandlerMapping 间接性承继自 ApplicationObjectSupport,并调用了 initApplicationContext 方式 (实际上该方式 也是一个免费模板方式 ),这也是 AbstractHandlerMapping 的复位通道方式 ,大家一起来看下:
- @Override
- protected void initApplicationContext() throws BeansException {
- extendInterceptors(this.interceptors);
- detectMappedInterceptors(this.adaptedInterceptors);
- initInterceptors();
- }
三个方式 都和拦截器相关。
extendInterceptors
- protected void extendInterceptors(List<Object> interceptors) {
- }
extendInterceptors 是一个免费模板方式 ,能够在派生类中完成,派生类完成了该方式 以后,能够对拦截器开展加上、删掉或是改动,但是在 SpringMVC 的实际完成中,实际上这一方式 并沒有在派生类中开展完成。
detectMappedInterceptors
- protected void detectMappedInterceptors(List<HandlerInterceptor> mappedInterceptors) {
- mappedInterceptors.addAll(BeanFactoryUtils.beansOfTypeIncludingAncestors(
- obtainApplicationContext(), MappedInterceptor.class, true, false).values());
- }
detectMappedInterceptors 方式 会从 SpringMVC 器皿及其 Spring 器皿中搜索全部 MappedInterceptor 种类的 Bean,搜索到以后加上到 mappedInterceptors 特性中(实际上便是全局性的 adaptedInterceptors 特性)。一般来说,大家界定好一个拦截器以后,也要在 XML 文档中配备该拦截器,拦截器及其各种各样配备信息内容,最后便会被封裝成一个 MappedInterceptor 目标。
initInterceptors
- protected void initInterceptors() {
- if (!this.interceptors.isEmpty()) {
- for (int i = 0; i < this.interceptors.size(); i ) {
- Object interceptor = this.interceptors.get(i);
- if (interceptor == null) {
- throw new IllegalArgumentException("Entry number " i " in interceptors array is null");
- }
- this.adaptedInterceptors.add(adaptInterceptor(interceptor));
- }
- }
- }
initInterceptors 方式 主要是开展拦截器的复位实际操作,主要内容是将 interceptors 结合中的拦截器加上到 adaptedInterceptors 结合中。
到此,大家见到,全部拦截器最后都是会被存进 adaptedInterceptors 自变量中。
AbstractHandlerMapping 的复位实际上也就是拦截器的复位全过程。
为何 AbstractHandlerMapping 中对拦截器这般高度重视呢?实际上并不是高度重视,大伙儿想一想,AbstractUrlHandlerMapping 和 AbstractHandlerMethodMapping 较大 的差别取决于搜索CPU的差别,一旦CPU找到,再去找拦截器,可是拦截器全是统一的,并没什么显著差别,因此 拦截器就统一在 AbstractHandlerMapping 中开展解决,而不容易去 AbstractUrlHandlerMapping 或是 AbstractHandlerMethodMapping 中解决。
下面大家再讨论一下 AbstractHandlerMapping#getHandler 方式 ,看一下CPU是怎样获得到的:
- @Override
- @Nullable
- public final HandlerExecutionChain getHandler(HttpServletRequest request) throws Exception {
- Object handler = getHandlerInternal(request);
- if (handler == null) {
- handler = getDefaultHandler();
- }
- if (handler == null) {
- return null;
- }
- // Bean name or resolved handler?
- if (handler instanceof String) {
- String handlerName = (String) handler;
- handler = obtainApplicationContext().getBean(handlerName);
- }
- // Ensure presence of cached lookupPath for interceptors and others
- if (!ServletRequestPathUtils.hasCachedPath(request)) {
- initLookupPath(request);
- }
- HandlerExecutionChain executionChain = getHandlerExecutionChain(handler, request);
- if (hasCorsConfigurationSource(handler) || CorsUtils.isPreFlightRequest(request)) {
- CorsConfiguration config = getCorsConfiguration(handler, request);
- if (getCorsConfigurationSource() != null) {
- CorsConfiguration globalConfig = getCorsConfigurationSource().getCorsConfiguration(request);
- config = (globalConfig != null ? globalConfig.combine(config) : config);
- }
- if (config != null) {
- config.validateAllowCredentials();
- }
- executionChain = getCorsHandlerExecutionChain(request, executionChain, config);
- }
- return executionChain;
- }
这一方式 的实行步骤是那样的:
下面大家再讨论一下第五步的 getHandlerExecutionChain 方式 的实行逻辑性,恰好是在这个方式 里面把 handler 变成了 HandlerExecutionChain:
- protected HandlerExecutionChain getHandlerExecutionChain(Object handler, HttpServletRequest request) {
- HandlerExecutionChain chain = (handler instanceof HandlerExecutionChain ?
- (HandlerExecutionChain) handler : new HandlerExecutionChain(handler));
- for (HandlerInterceptor interceptor : this.adaptedInterceptors) {
- if (interceptor instanceof MappedInterceptor) {
- MappedInterceptor mappedInterceptor = (MappedInterceptor) interceptor;
- if (mappedInterceptor.matches(request)) {
- chain.addInterceptor(mappedInterceptor.getInterceptor());
- }
- }
- else {
- chain.addInterceptor(interceptor);
- }
- }
- return chain;
- }
这儿立即依据现有的 handler 建立一个新的 HandlerExecutionChain 目标,随后解析xml adaptedInterceptors 结合,该结合里储放的全是拦截器,假如拦截器的种类是 MappedInterceptor,则启用 matches 方式 去配对一下,看一下是不是阻拦当今要求的拦截器,如果是,则启用 chain.addInterceptor 方式 添加到 HandlerExecutionChain 目标中;假如便是一个一般拦截器,则立即添加到 HandlerExecutionChain 目标中。
这就是 AbstractHandlerMapping#getHandler 方式 的大概逻辑性,能够见到,这儿留了一个免费模板方式 getHandlerInternal 在派生类中完成,下面大家就讨论一下它的派生类。
AbstractUrlHandlerMapping,看姓名就了解,全是依照 URL 详细地址来开展配对的,它的基本原理便是将 URL 详细地址与相匹配的 Handler 储存在同一个 Map 中,当启用 getHandlerInternal 方式 时,就依据要求的 URL 去 Map 中寻找相匹配的 Handler 回到就可以了。
这儿大家就先从他的 getHandlerInternal 方式 逐渐看起:
- @Override
- @Nullable
- protected Object getHandlerInternal(HttpServletRequest request) throws Exception {
- String lookupPath = initLookupPath(request);
- Object handler;
- if (usesPathPatterns()) {
- RequestPath path = ServletRequestPathUtils.getParsedRequestPath(request);
- handler = lookupHandler(path, lookupPath, request);
- }
- else {
- handler = lookupHandler(lookupPath, request);
- }
- if (handler == null) {
- // We need to care for the default handler directly, since we need to
- // expose the PATH_WITHIN_HANDLER_MAPPING_ATTRIBUTE for it as well.
- Object rawHandler = null;
- if (StringUtils.matchesCharacter(lookupPath, '/')) {
- rawHandler = getRootHandler();
- }
- if (rawHandler == null) {
- rawHandler = getDefaultHandler();
- }
- if (rawHandler != null) {
- // Bean name or resolved handler?
- if (rawHandler instanceof String) {
- String handlerName = (String) rawHandler;
- rawHandler = obtainApplicationContext().getBean(handlerName);
- }
- validateHandler(rawHandler, request);
- handler = buildPathExposingHandler(rawHandler, lookupPath, lookupPath, null);
- }
- }
- return handler;
- }
这就是全部 getHandlerInternal 方式 的逻辑性,事实上并不会太难,里面关键牵涉到 lookupHandler 和 buildPathExposingHandler 2个方式 ,必须和大伙儿详解下,大家各自看来。
lookupHandler
lookupHandler 有两个,大家各自看来。
- @Nullable
- protected Object lookupHandler(String lookupPath, HttpServletRequest request) throws Exception {
- Object handler = getDirectMatch(lookupPath, request);
- if (handler != null) {
- return handler;
- }
- // Pattern match?
- List<String> matchingPatterns = new ArrayList<>();
- for (String registeredPattern : this.handlerMap.keySet()) {
- if (getPathMatcher().match(registeredPattern, lookupPath)) {
- matchingPatterns.add(registeredPattern);
- }
- else if (useTrailingSlashMatch()) {
- if (!registeredPattern.endsWith("/") && getPathMatcher().match(registeredPattern "/", lookupPath)) {
- matchingPatterns.add(registeredPattern "/");
- }
- }
- }
- String bestMatch = null;
- Comparator<String> patternComparator = getPathMatcher().getPatternComparator(lookupPath);
- if (!matchingPatterns.isEmpty()) {
- matchingPatterns.sort(patternComparator);
- bestMatch = matchingPatterns.get(0);
- }
- if (bestMatch != null) {
- handler = this.handlerMap.get(bestMatch);
- if (handler == null) {
- if (bestMatch.endsWith("/")) {
- handler = this.handlerMap.get(bestMatch.substring(0, bestMatch.length() - 1));
- }
- if (handler == null) {
- throw new IllegalStateException(
- "Could not find handler for best pattern match [" bestMatch "]");
- }
- }
- // Bean name or resolved handler?
- if (handler instanceof String) {
- String handlerName = (String) handler;
- handler = obtainApplicationContext().getBean(handlerName);
- }
- validateHandler(handler, request);
- String pathWithinMapping = getPathMatcher().extractPathWithinPattern(bestMatch, lookupPath);
- // There might be multiple 'best patterns', let's make sure we have the correct URI template variables
- // for all of them
- Map<String, String> uriTemplateVariables = new LinkedHashMap<>();
- for (String matchingPattern : matchingPatterns) {
- if (patternComparator.compare(bestMatch, matchingPattern) == 0) {
- Map<String, String> vars = getPathMatcher().extractUriTemplateVariables(matchingPattern, lookupPath);
- Map<String, String> decodedVars = getUrlPathHelper().decodePathVariables(request, vars);
- uriTemplateVariables.putAll(decodedVars);
- }
- }
- return buildPathExposingHandler(handler, bestMatch, pathWithinMapping, uriTemplateVariables);
- }
- // No handler found...
- return null;
- }
- @Nullable
- private Object getDirectMatch(String urlPath, HttpServletRequest request) throws Exception {
- Object handler = this.handlerMap.get(urlPath);
- if (handler != null) {
- // Bean name or resolved handler?
- if (handler instanceof String) {
- String handlerName = (String) handler;
- handler = obtainApplicationContext().getBean(handlerName);
- }
- validateHandler(handler, request);
- return buildPathExposingHandler(handler, urlPath, urlPath, null);
- }
- return null;
- }
1.这儿最先启用 getDirectMatch 方式 立即去 handlerMap 中找相匹配的CPU,handlerMap 中就储存了要求 URL 和CPU的投射关联,实际的搜索全过程便是先去 handlerMap 中找,找到,如果是 String,则去 Spring 器皿中找相匹配的 Bean,随后启用 validateHandler 方式 去认证(事实上沒有认证,前边早已讲了),最终启用 buildPathExposingHandler 方式 加上拦截器。
2.假如 getDirectMatch 方式 传参不以 null,则立即将搜索到的 handler 回到,方式 到这里。那麼什么情况 getDirectMatch 方式 的传参不以 null 呢?简易来收便是沒有使用通配符的状况下,要求详细地址中沒有使用通配符,一个要求详细地址相匹配一个CPU,仅有这类状况,getDirectMatch 方式 传参才不以 null,由于 handlerMap 中储存的是编码的界定,例如大家界定编码的情况下,某一CPU的浏览途径很有可能含有使用通配符,可是在我们真实进行要求的情况下,要求途径里是沒有使用通配符的,这个时候再去 handlerMap 中就找不对相匹配的CPU了。假如采用了界定插口时采用了使用通配符,则必须在下面的编码中再次解决。
3.下面解决使用通配符的状况。最先界定 matchingPatterns 结合,将当今要求途径和 handlerMap 结合中储存的要求途径标准开展比照,但凡能配对上的标准都立即存进 matchingPatterns 结合中。实际解决中,还有一个 useTrailingSlashMatch 的很有可能,有的小伙伴们 SpringMVC 用的不娴熟,见到这儿很有可能就愣住,这儿是那样的,SpringMVC 中,默认设置是能够配对末尾 / 的,举个简易事例,假如你界定的插口是/user,那麼要求途径能够是 /user 还可以 /user/,这二种默认设置全是适用的,因此 这儿的 useTrailingSlashMatch 支系主要是解决后边这类状况,处理方法非常简单,就在 registeredPattern 后边再加上 / 随后再次和要求途径开展配对。
4.因为一个要求 URL 很有可能会和界定的好几个插口配对上,因此 matchingPatterns 自变量是一个二维数组,下面就需要对 matchingPatterns 开展排列,排列进行后,选择排序后的第一项做为最好选择项取值给 bestMatch 自变量。默认设置的排列标准是 AntPatternComparator,自然开发人员还可以自定。AntPatternComparator 中界定的优先以下:
| 路由器配备 | 优先 |
|---|---|
没有一切特殊字符的途径,如:配备路由器/a/b/c |
第一优先 |
含有{}的途径,如:/a/{b}/c |
第二优先 |
含有正则表达式的途径,如:/a/{regex:\d{3}}/c |
第三优先 |
含有*的途径,如:/a/b/* |
第四优先 |
含有**的途径,如:/a/b/** |
第五优先 |
最模糊不清的配对:/** |
最低优先级队列 |
5.寻找 bestMatch 以后,下面再依据 bestMatch 去 handlerMap 中寻找相匹配的CPU,立即找假如没找到,就要查验 bestMatch 是不是以 / 末尾,如果是以 / 末尾,则除掉末尾的 / 再去 handlerMap 中搜索,假如还没找到,那么就该抛出现异常出来。假如寻找的 handler 是 String 种类的,则再去 Spring 器皿中搜索相匹配的 Bean,下面再启用 validateHandler 方式 开展认证。
6.下面启用 extractPathWithinPattern 方式 获取出投射途径,比如界定的插口标准是 myroot/*.html,要求途径是 myroot/myfile.html,那麼最后获得到的便是myfile.html。
7.下面的 for 循环系统是为了更好地解决存有好几个最好配对标准的状况,在第四步中,大家对 matchingPatterns 开展排列,排列进行后,挑选第一项做为最好选择项取值给 bestMatch,可是最好选择项很有可能会出现好几个,这儿便是解决最好选择项有好几个的状况。
8.最终启用 buildPathExposingHandler 方式 申请注册2个內部拦截器,该方式 下面我能给大伙儿详解。
lookupHandler 还有一个轻载方式 ,但是只需大伙儿把这个方式 的实行步骤弄清楚了,轻载方式 实际上非常好了解,这儿松哥就不会再过多阐释了,唯一说起的便是轻载方式 用了 PathPattern 去配对 URL 途径,而这一方式 用了 AntPathMatcher 去配对 URL 途径。
buildPathExposingHandler
- protected Object buildPathExposingHandler(Object rawHandler, String bestMatchingPattern,
- String pathWithinMapping, @Nullable Map<String, String> uriTemplateVariables) {
- HandlerExecutionChain chain = new HandlerExecutionChain(rawHandler);
- chain.addInterceptor(new PathExposingHandlerInterceptor(bestMatchingPattern, pathWithinMapping));
- if (!CollectionUtils.isEmpty(uriTemplateVariables)) {
- chain.addInterceptor(new UriTemplateVariablesHandlerInterceptor(uriTemplateVariables));
- }
- return chain;
- }
buildPathExposingHandler 方式 向 HandlerExecutionChain 中加上了2个拦截器 PathExposingHandlerInterceptor 和 UriTemplateVariablesHandlerInterceptor,这两个拦截器在分别的 preHandle 中各自向 request 目标加上了一些特性,实际加上的特性朋友们能够自主查询,这一非常简单,我不多讲了。
在前面的方式 中,牵涉到一个关键的自变量 handlerMap,大家界定的插口和CPU中间的关联都储存在这个自变量中,那麼这一自变量是怎么复位的呢?这就牵涉到 AbstractUrlHandlerMapping 中的另一个方式 registerHandler:
- protected void registerHandler(String[] urlPaths, String beanName) throws BeansException, IllegalStateException {
- for (String urlPath : urlPaths) {
- registerHandler(urlPath, beanName);
- }
- }
- protected void registerHandler(String urlPath, Object handler) throws BeansException, IllegalStateException {
- Object resolvedHandler = handler;
- if (!this.lazyInitHandlers && handler instanceof String) {
- String handlerName = (String) handler;
- ApplicationContext applicationContext = obtainApplicationContext();
- if (applicationContext.isSingleton(handlerName)) {
- resolvedHandler = applicationContext.getBean(handlerName);
- }
- }
- Object mappedHandler = this.handlerMap.get(urlPath);
- if (mappedHandler != null) {
- if (mappedHandler != resolvedHandler) {
- throw new IllegalStateException(
- "Cannot map " getHandlerDescription(handler) " to URL path [" urlPath
- "]: There is already " getHandlerDescription(mappedHandler) " mapped.");
- }
- }
- else {
- if (urlPath.equals("/")) {
- setRootHandler(resolvedHandler);
- }
- else if (urlPath.equals("/*")) {
- setDefaultHandler(resolvedHandler);
- }
- else {
- this.handlerMap.put(urlPath, resolvedHandler);
- if (getPatternParser() != null) {
- this.pathPatternHandlerMap.put(getPatternParser().parse(urlPath), resolvedHandler);
- }
- }
- }
- }
registerHandler(String[],String) 方式 有两个主要参数,第一个便是界定的要求途径,第二个主要参数则是CPU Bean 的姓名,第一个主要参数是一个二维数组,那是由于同一个CPU能够相匹配好几个不一样的要求途径。
在轻载方式 registerHandler(String,String) 里面,完成了 handlerMap 的复位,实际步骤以下:
这就是 AbstractUrlHandlerMapping 的关键工作中,在其中 registerHandler 将在它的派生类中启用。
下面大家看来 AbstractUrlHandlerMapping 的派生类。
为了更好地便捷解决,SimpleUrlHandlerMapping 中自身界定了一个 urlMap 自变量,那样能够在申请注册以前做一些预备处理,比如保证 全部的 URL 全是以 / 逐渐。SimpleUrlHandlerMapping 在界定时调用了父类的 initApplicationContext 方式 ,并在该方式 中启用了 registerHandlers,在 registerHandlers 中又启用了父类的 registerHandler 方式 完成了 handlerMap 的复位实际操作:
- @Override
- public void initApplicationContext() throws BeansException {
- super.initApplicationContext();
- registerHandlers(this.urlMap);
- }
- protected void registerHandlers(Map<String, Object> urlMap) throws BeansException {
- if (urlMap.isEmpty()) {
- logger.trace("No patterns in " formatMappingName());
- }
- else {
- urlMap.forEach((url, handler) -> {
- // Prepend with slash if not already present.
- if (!url.startsWith("/")) {
- url = "/" url;
- }
- // Remove whitespace from handler bean name.
- if (handler instanceof String) {
- handler = ((String) handler).trim();
- }
- registerHandler(url, handler);
- });
- }
- }
这方面编码非常简单,确实没啥好说的,假如 URL 并不是以 / 开始,则手动式给它再加上/ 就可以。有朋友们很有可能要问了,urlMap 的值从哪里来?自然是以大家的环境变量里面来呀,像下边那样:
- <bean class="org.springframework.web.servlet.handler.SimpleUrlHandlerMapping">
- <property name="urlMap">
- <map>
- <entry key="/aaa" value-ref="/hello"/>
- </map>
- </property>
- </bean>
AbstractDetectingUrlHandlerMapping 也是 AbstractUrlHandlerMapping 的派生类,可是它和 SimpleUrlHandlerMapping 有一些不一样的地区。
不一样的是哪儿呢?
AbstractDetectingUrlHandlerMapping 会全自动搜索到 SpringMVC 器皿及其 Spring 器皿中的全部 beanName,随后依据 beanName 分析出相匹配的 URL 详细地址,再将分析出的 url 详细地址和相匹配的 beanName 申请注册到父类的 handlerMap 自变量中。也就是说,假如你用了 AbstractDetectingUrlHandlerMapping,就无需像 SimpleUrlHandlerMapping 那般去逐个配备 URL 详细地址和CPU的投射关联了。大家看来下 AbstractDetectingUrlHandlerMapping#initApplicationContext 方式 :
- @Override
- public void initApplicationContext() throws ApplicationContextException {
- super.initApplicationContext();
- detectHandlers();
- }
- protected void detectHandlers() throws BeansException {
- ApplicationContext applicationContext = obtainApplicationContext();
- String[] beanNames = (this.detectHandlersInAncestorContexts ?
- BeanFactoryUtils.beanNamesForTypeIncludingAncestors(applicationContext, Object.class) :
- applicationContext.getBeanNamesForType(Object.class));
- for (String beanName : beanNames) {
- String[] urls = determineUrlsForHandler(beanName);
- if (!ObjectUtils.isEmpty(urls)) {
- registerHandler(urls, beanName);
- }
- }
- }
AbstractDetectingUrlHandlerMapping 调用了父类的 initApplicationContext 方式 ,并在该方式 中启用了 detectHandlers 方式 ,在 detectHandlers 中,最先搜索到全部的 beanName,随后启用 determineUrlsForHandler 方式 剖析出 beanName 相匹配的 URL,但是这儿的 determineUrlsForHandler 方式 是一个空方式 ,实际的完成在它的派生类中,AbstractDetectingUrlHandlerMapping 只有一个派生类 BeanNameUrlHandlerMapping,大家一起来看下:
- public class BeanNameUrlHandlerMapping extends AbstractDetectingUrlHandlerMapping {
- @Override
- protected String[] determineUrlsForHandler(String beanName) {
- List<String> urls = new ArrayList<>();
- if (beanName.startsWith("/")) {
- urls.add(beanName);
- }
- String[] aliases = obtainApplicationContext().getAliases(beanName);
- for (String alias : aliases) {
- if (alias.startsWith("/")) {
- urls.add(alias);
- }
- }
- return StringUtils.toStringArray(urls);
- }
- }
这一类非常简单,里面就一个 determineUrlsForHandler 方式 ,这一方式 的实行逻辑性也非常简单,就分辨 beanName 是否以 / 逐渐,如果是,则将之做为 URL。
如果我们要想在新项目中应用 BeanNameUrlHandlerMapping,配备方法以下:
- <bean class="org.javaboy.init.HelloController" name="/hello"/>
- <bean class="org.springframework.web.servlet.handler.BeanNameUrlHandlerMapping" id="handlerMapping">
- </bean>
留意,Controller 的 name 务必是以 / 逐渐,不然该 bean 不容易被全自动做为CPU。
到此,AbstractUrlHandlerMapping 管理体系下的物品就和大伙儿共享完后。
AbstractHandlerMethodMapping 管理体系下仅有三个类,分别是 AbstractHandlerMethodMapping、RequestMappingInfoHandlerMapping 及其 RequestMappingHandlerMapping,如下图:

在前面第三小标题的 AbstractUrlHandlerMapping 管理体系下,一个 Handler 一般便是一个类,可是在 AbstractHandlerMethodMapping 管理体系下,一个 Handler 便是一个 Mehtod,这也是大家现阶段应用 SpringMVC 时最普遍的使用方法,即立即用 @RequestMapping 去标识一个方式 ,该方式 便是一个 Handler。
下面大家就一起来看一下 AbstractHandlerMethodMapping。
AbstractHandlerMethodMapping 类完成了 InitializingBean 插口,因此 Spring 器皿会全自动启用其 afterPropertiesSet 方式 ,在这儿将进行复位实际操作:
- @Override
- public void afterPropertiesSet() {
- initHandlerMethods();
- }
- protected void initHandlerMethods() {
- for (String beanName : getCandidateBeanNames()) {
- if (!beanName.startsWith(SCOPED_TARGET_NAME_PREFIX)) {
- processCandidateBean(beanName);
- }
- }
- handlerMethodsInitialized(getHandlerMethods());
- }
- protected String[] getCandidateBeanNames() {
- return (this.detectHandlerMethodsInAncestorContexts ?
- BeanFactoryUtils.beanNamesForTypeIncludingAncestors(obtainApplicationContext(), Object.class) :
- obtainApplicationContext().getBeanNamesForType(Object.class));
- }
- protected void processCandidateBean(String beanName) {
- Class<?> beanType = null;
- try {
- beanType = obtainApplicationContext().getType(beanName);
- }
- catch (Throwable ex) {
- }
- if (beanType != null && isHandler(beanType)) {
- detectHandlerMethods(beanName);
- }
- }
能够见到,实际的复位也是在 initHandlerMethods 方式 中进行的,在该方式 中,最先启用 getCandidateBeanNames 方式 获得器皿中全部的 beanName,随后启用 processCandidateBean 方式 对这种备选的 beanName 开展解决,实际的解决构思便是依据 beanName 寻找 beanType,随后启用 isHandler 方式 分辨该 beanType 是否一个 Handler,isHandler 是一个空方式 ,在它的派生类 RequestMappingHandlerMapping 中被完成了,该方式 主要是查验该 beanType 上是否有 @Controller 或是 @RequestMapping 注释,如果有,表明这就是我们想要的 handler,下面再启用 detectHandlerMethods 方式 储存 URL 和 handler 的投射关联:
- protected void detectHandlerMethods(Object handler) {
- Class<?> handlerType = (handler instanceof String ?
- obtainApplicationContext().getType((String) handler) : handler.getClass());
- if (handlerType != null) {
- Class<?> userType = ClassUtils.getUserClass(handlerType);
- Map<Method, T> methods = MethodIntrospector.selectMethods(userType,
- (MethodIntrospector.MetadataLookup<T>) method -> {
- try {
- return getMappingForMethod(method, userType);
- }
- catch (Throwable ex) {
- throw new IllegalStateException("Invalid mapping on handler class ["
- userType.getName() "]: " method, ex);
- }
- });
- methods.forEach((method, mapping) -> {
- Method invocableMethod = AopUtils.selectInvocableMethod(method, userType);
- registerHandlerMethod(handler, invocableMethod, mapping);
- });
- }
- }
上边这一段编码里又牵涉到2个方式 :
大家各自看来:
getMappingForMethod
getMappingForMethod 是一个免费模板方式 ,实际的完成也是在派生类 RequestMappingHandlerMapping 里面:
- @Override
- @Nullable
- protected RequestMappingInfo getMappingForMethod(Method method, Class<?> handlerType) {
- RequestMappingInfo info = createRequestMappingInfo(method);
- if (info != null) {
- RequestMappingInfo typeInfo = createRequestMappingInfo(handlerType);
- if (typeInfo != null) {
- info = typeInfo.combine(info);
- }
- String prefix = getPathPrefix(handlerType);
- if (prefix != null) {
- info = RequestMappingInfo.paths(prefix).options(this.config).build().combine(info);
- }
- }
- return info;
- }
最先依据 method 目标,启用 createRequestMappingInfo 方式 获得一个 RequestMappingInfo,一个 RequestMappingInfo 包括了一个接口标准的详细资料,比如主要参数、header、produces、consumes、要求方式 这些信息内容都在这儿边。下面再依据 handlerType 也获得一个 RequestMappingInfo,并启用 combine 方式 将2个 RequestMappingInfo 开展合拼。下面启用 getPathPrefix 方式 查询 handlerType 上是否有 URL 作为前缀,如果有,就加上到 info 里面去,最终将 info 回到。
这儿说起一下 handlerType 里面的这一作为前缀是那边来的,我们可以在 Controller 上应用 @RequestMapping 注释,配备一个途径作为前缀,那样 Controller 中的全部方式 都再加上了该途径作为前缀,可是这类方法必须一个一个的配备,假如想一次性配备全部的 Controller 呢?我们可以应用 Spring5.1 中澳引进的方式 addPathPrefix 来配备,以下:
- @Configuration
- public class WebConfig implements WebMvcConfigurer {
- @Override
- public void configurePathMatch(PathMatchConfigurer configurer) {
- configurer.setPatternParser(new PathPatternParser()).addPathPrefix("/itboyhub", HandlerTypePredicate.forAnnotation(RestController.class));
- }
- }
上边这一配备表明,全部的 @RestController 标识的类都全自动再加上 itboyhub作为前缀。拥有这一配备以后,上边的 getPathPrefix 方式 获得到的便是/itboyhub 了。
registerHandlerMethod
当找全了 URL 和 handlerMethod 以后,下面便是将这种信息内容储存出来,方法以下:
- protected void registerHandlerMethod(Object handler, Method method, T mapping) {
- this.mappingRegistry.register(mapping, handler, method);
- }
- public void register(T mapping, Object handler, Method method) {
- this.readWriteLock.writeLock().lock();
- try {
- HandlerMethod handlerMethod = createHandlerMethod(handler, method);
- validateMethodMapping(handlerMethod, mapping);
- Set<String> directPaths = AbstractHandlerMethodMapping.this.getDirectPaths(mapping);
- for (String path : directPaths) {
- this.pathLookup.add(path, mapping);
- }
- String name = null;
- if (getNamingStrategy() != null) {
- name = getNamingStrategy().getName(handlerMethod, mapping);
- addMappingName(name, handlerMethod);
- }
- CorsConfiguration corsConfig = initCorsConfiguration(handler, method, mapping);
- if (corsConfig != null) {
- corsConfig.validateAllowCredentials();
- this.corsLookup.put(handlerMethod, corsConfig);
- }
- this.registry.put(mapping,
- new MappingRegistration<>(mapping, handlerMethod, directPaths, name, corsConfig != null));
- }
- finally {
- this.readWriteLock.writeLock().unlock();
- }
- }
多讲一句,第四步这个东西有啥用呢?这一实际上是 Spring4 中逐渐提升的作用,算作一个黑洞特效吧,尽管日常开发设计非常少用,可是我这里或是和大伙说一下。
倘若您有以下一个插口:
- @RestController
- @RequestMapping("/javaboy")
- public class HelloController {
- @GetMapping("/aaa")
- public String hello99() {
- return "aaa";
- }
- }
如果你要求该插口的情况下,不愿根据途径,想立即根据方式 名,可不可以呢?当然可以!
在 jsp 文档中,加上以下网页链接:
- <%@ taglib prefix="s" uri="http://www.springframework.org/tags" %>
- <%@ page contentType="text/html;charset=UTF-8" language="java" %>
- <html>
- <head>
- <title>Title</title>
- </head>
- <body>
- <a href="${s:mvcUrl('HC#hello99').build()}">Go!</a>
- </body>
- </html>
当这一 jsp 网页页面3D渲染进行后,href 特性就全自动变成 hello99 方式 的要求途径了。这一作用的完成,就取决于前边第四步的內容。
到此,大家就把 AbstractHandlerMethodMapping 的复位步骤看完了。
下面大家看来下当要求来临后,AbstractHandlerMethodMapping 会如何处理。
和前边第三小标题一样,这儿解决要求的通道方式 也是 getHandlerInternal,以下:
- @Override
- protected HandlerMethod getHandlerInternal(HttpServletRequest request) throws Exception {
- String lookupPath = initLookupPath(request);
- this.mappingRegistry.acquireReadLock();
- try {
- HandlerMethod handlerMethod = lookupHandlerMethod(lookupPath, request);
- return (handlerMethod != null ? handlerMethod.createWithResolvedBean() : null);
- }
- finally {
- this.mappingRegistry.releaseReadLock();
- }
- }
- protected HandlerMethod lookupHandlerMethod(String lookupPath, HttpServletRequest request) throws Exception {
- List<Match> matches = new ArrayList<>();
- List<T> directPathMatches = this.mappingRegistry.getMappingsByDirectPath(lookupPath);
- if (directPathMatches != null) {
- addMatchingMappings(directPathMatches, matches, request);
- }
- if (matches.isEmpty()) {
- addMatchingMappings(this.mappingRegistry.getRegistrations().keySet(), matches, request);
- }
- if (!matches.isEmpty()) {
- Match bestMatch = matches.get(0);
- if (matches.size() > 1) {
- Comparator<Match> comparator = new MatchComparator(getMappingComparator(request));
- matches.sort(comparator);
- bestMatch = matches.get(0);
- if (CorsUtils.isPreFlightRequest(request)) {
- for (Match match : matches) {
- if (match.hasCorsConfig()) {
- return PREFLIGHT_AMBIGUOUS_MATCH;
- }
- }
- }
- else {
- Match secondBestMatch = matches.get(1);
- if (comparator.compare(bestMatch, secondBestMatch) == 0) {
- Method m1 = bestMatch.getHandlerMethod().getMethod();
- Method m2 = secondBestMatch.getHandlerMethod().getMethod();
- String uri = request.getRequestURI();
- throw new IllegalStateException(
- "Ambiguous handler methods mapped for '" uri "': {" m1 ", " m2 "}");
- }
- }
- }
- request.setAttribute(BEST_MATCHING_HANDLER_ATTRIBUTE, bestMatch.getHandlerMethod());
- handleMatch(bestMatch.mapping, lookupPath, request);
- return bestMatch.getHandlerMethod();
- }
- else {
- return handleNoMatch(this.mappingRegistry.getRegistrations().keySet(), lookupPath, request);
- }
- }
这儿就较为非常容易,根据 lookupHandlerMethod 寻找相匹配的 HandlerMethod 回到就可以,假如 lookupHandlerMethod 方式 传参不以 null,则根据 createWithResolvedBean 建立 HandlerMethod(主要是确定里面的 Bean 等),实际的建立全过程松哥在后面的文章内容中会专业和大伙儿共享。lookupHandlerMethod 方式 也较为非常容易:
SpringMVC 九大部件,今日和朋友们把 HandlerMapping 过去了一遍,实际上只需用心看,这儿并沒有难题。假如朋友们感觉阅读文章费劲,还可以在公众号后台回应 ssm,查询松哥视频录制的完全免费基础教程~


